

Parts List:
-
(2) FABbot 04-12 Colorado/Canyon Billet Upper Coilover Mounts
-
(2) Viking Coilover Shocks
-
(2) Viking Coilover Springs
-
(2) Viking Lower Coilover Perches
-
(2) Viking Lower Coilover Perch Locking Rings
-
(2) 14mm ID x .625” OD x 1.25” Long Steel Sleeves
-
(6) M10 x 1.25 Serrated Flange Locknuts
-
(4) Snap Rings
-
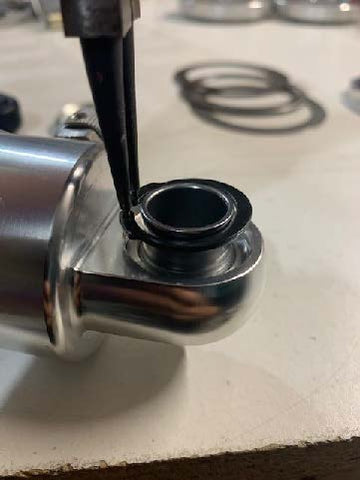
(2) Spherical Bearings
-
(4) 9/16” Stainless Steel Washers
-
(2) Thrust Bearings
-
(4) Thrust Bearing Washers
-
(4) Upper Mount Isolator Bushings
-
(4) Upper Mount Isolator Bushing Cupped Washers
-
(2) Upper Mount Nuts
Assembly:
1.) Unbox all the parts and lay them out. The Viking coilovers will come with some extra parts that won’t be used. Use the parts list found in these instructions to identify the parts needed.


2.) Install (1) snap ring in the bottom of the coilovers.

3.) Install lower spherical bearings in the coilovers.

4.) Install the last snap rings into the bottom of the coilovers to retain the spherical bearings.
5.) Install the lower coilover perch locking rings on the coilover shocks with the flat face pointing downward. Thread the lock ring all the way to the bottom of the shock.

6.) Install the lower coilover perches on the coilover shocks with the flat face pointing downward.
Thread the perches all the way to the bottom of the shock.

7.) Install the thrust bearing washers and thrust bearings onto the coilover perches. The order is:
“Washer | Thrust Bearing | Washer”


8.) Install coil springs.

9.) Slide (1) cupped washer on the shock shafts with the cupped side facing upward.

Small piloting ring
10.) Slide (1) upper mount bushing onto the shock shafts. Make sure to place the end of the bush with the smaller piloting ring upward.

11.) Install upper billet shock mounts with the studs facing upward.

12.) Slide (1) upper mount bushing onto the shock shafts. Make sure to place the end of the bushing with the smaller piloting ring downward.

13.) Slide (1) cupped washer on the shock shafts with the cupped side facing downward.

14.) Install upper mount nut. Viking provides two different nuts. Use the thicker one of the two.

15.) Tighten the upper mount nut with a 14mm socket. An electric impact makes this step easier since the shock shaft will want to spin. Tighten the nut until there is ~.25” of threads showing.


16.) Now turn the shock upside down so that the spring is centered and resting on the upper mount, and the thrust bearing assembly is centered and resting on the spring. While in this position, thread the perch and perch lock down until it contacts the spring.


Installation:
1.) Remove factory front coilover shocks
2.) Trim ~.5” off the factory bump stop mount on the frame. A cutoff wheel, Sawzall, torch, and/or plasma cutter can be used to do this.

3.) If you are using the factory lower control arms, the shock tabs will need to be trimmed. Again, a cutoff wheel, Sawzall, torch, and/or plasma cutter can be used to do this.

4.) Slide the coilovers into position in the vehicle with the upper mount studs penetrating through the holes in the upper shock mount in the frame.
5.) With the coilovers in position, thread the M10 x 1.25 serrated flange locknuts onto the upper mount studs to hold the coilovers in position. Do not tighten at this time.
6.) Install the 14mm ID x .625” OD x 1.25” long steel sleeves into the spherical bearings of the coilovers.
7.) Slide the bottom of the coilover into position between the two lower shock mounting tabs on the lower control arms.
8.) Place (1) 9/16” stainless steel washer on each side of the spherical bearing between the spherical bearing and the lower shock tabs on the lower control arm.
9.) Install the factory lower shock bolt and nut and tighten to 150 ft.lbs. 10.) Tighten upper serrated mount nuts to 45 ft.lbs.
11.) Reassemble front suspension
Adjustments:
Ride Height –
With the front of the vehicle lifted in the air, rotate the spring perches using the provided spanner wrenches so that the spring perches move up the body of the coilover shock. Make sure that you adjust each side evenly. Make small adjustments and lower the vehicle to measure the results. Make sure to jounce the vehicle on the ground a few times before taking any measurements. Repeat this process until the desired ride height is achieved. Once the desired ride height is achieved, tighten the spring perch locking ring against the spring perch using both supplied spanner wrenches.
Shock Compression and Rebound Adjustment –
Vehicles used on the street, drag cars, and road racers will all have different needs in terms of shock valving. However, it does not stop there. Driver style / capability, road / track conditions, vehicle type (car vs. pickup, etc.), vehicle weight, horsepower, tires, etc. all create different needs in terms of shock valving. That is the beauty of a double adjustable shock. Your Viking shocks have a total of 19 positions (18 clicks plus a zero position) of adjustment per knob, for a total of 361 different valving options.
Compression and rebound are independently controlled on the Viking shocks. The “C” knob adjusts
compression, while the “R” knob adjusts rebound. Every Viking shock is tested on a dynamometer prior to shipment to ensure that it is functioning properly. Manually moving a shock is not an accurate testing method for ensuring that shocks are functioning properly. Position zero is the softest setting and is found by turning the knob counterclockwise until the positive stop is located. Position 18 is the stiffest setting. Only very light force is needed to adjust the knobs; do not ever force the knob past its intended stop as doing so will damage the shock.
Recommended baseline points for adjusting your Viking shocks are as follows:
|
|
Comfort |
Handling |
AutoX |
Drag <600 HP |
Drag 600- 900 HP |
Drag >900 HP |
|
"C" Knob |
1-4 |
8-10 |
10-14 |
12-18 |
12-18 |
12-18 |
|
"R" Knob |
4-8 |
10-14 |
14-18 |
0-4 |
0-6 |
2-8 |